Two wild plum jam recipes
Posted by Fiona Nevile in Jam Jelly and Preserves | 122 comments
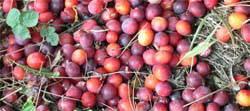
Photo: Wild plums make delicious jam
Here are two of our wild plum jam recipes. Wild plums taste quite tart, similar to damsons. They are excellent for jam and jelly and both are not too sweet.
The following recipes describe two methods for making wild plum jam.
If your plums are barely ripe (still pretty firm) go for the first one, if they are soft and ripe go for the second. The barely ripe recipe will have a sharper taste.
Barely ripe wild plum jam recipe:
Ingredients:
900g/2lb of barely ripe wild plums
900g/2lb of preserving sugar
Method:
- Wash the plums and discard any damaged fruit.
- Slit the plums with a knife. This will allow the stones to float to the surface during cooking so that they can be easily removed.
- Place plums in a non metallic bowl, sprinkle over sugar and mix to coat the plums.
- Cover with a clean tea cloth and leave overnight.
- The following day put plums and sugar into a large heavy bottomed saucepan (or preserving pan) and heat very gently until the sugar has dissolved.
- Bring the jam to the boil and continue to boil very rapidly for about 8-10 minutes until the jam reaches setting point. At this stage carefully remove the stones as they float up to the surface, with a slotted spoon. (What is setting point? See tricks and tips below).
- When the jam has set, carefully pour into warm, sterilised jars, using a ladle or small jug (How to sterilise jars? See tricks and tips below)
- Cover the jars with tight fitting screw-top lids, or waxed disks and cellophane pot covers (waxed disks, wax facing upwards and plastic covers secured with plastic bands).
- when cold and store in a cool, dark place, away from damp.
Ripe wild plum jam recipe:
Ingredients:
900g/2lb of ripe wild plums
900g/2lb of white granulated sugar – if you prefer a more tart jam cut the sugar by a quarter – I prefer less sugar myself
½ pint/275ml of water
Method:
- Wash the plums and discard any damaged fruit.
- Put the plums and water into a large heavy bottomed saucepan (or preserving pan) and simmer gently until the skins split and they are soft.
- Meanwhile, warm the sugar in a low oven for ten minutes and add to the fruit.
- Stir gently over a low heat until you are sure that all the sugar crystals have dissolved.
- Turn up the heat to its highest setting and, stirring frequently, let the fruit boil rapidly for 8-10 minutes (this is called a rolling boil).
- Remove the stones with a slotted spoon during the boiling process.
- Test for set (What is set/ setting point? See tricks and tips below).
- If the jam has not set, continue to boil rapidly and test at five minute intervals.
- When the jam has set carefully pour into warm, sterilised jars, using a ladle or small jug. (How to sterilise jars? See tricks and tips below)
- Cover the jars with tight fitting screw-top lids, or waxed disks and cellophane pot covers (waxed disks, wax facing upwards and plastic covers secured with plastic bands).
- Label when cold and store in a cool, dark place, away from damp.
Tips and tricks:
Jam “set” or “setting point”:
Getting the right set can be tricky. I have tried using a jam thermometer but find it easier to use the following method. Before you start to make the jam, put a couple of plates in the fridge so that the warm jam can be drizzled onto a cold plate (when we make jam we often forget to return the plate to the fridge between tests, using two plates means that you have a spare cold plate). Return the plate to the fridge to cool for approx two minutes. It has set when you run your finger through it and leave a crinkly track mark. If after two minutes the cooled jam is too liquid, continue to boil the jam, testing it every few minutes until you have the right set. The jam is far more delicious if it is slightly runny.
Sterilising the jars:
We collect jars all year round for our jelly, chutney and jam making sessions. I try to soak off labels and store the clean jars and metal plastic coated screw-top lids in an accessible place. The sterilising method that we used is simple. Just before making the jam, I quickly wash and rinse the jars and place them upside down in a cold oven. Set the temperature to 160c/140c for fan assisted. When the oven has reached the right temperature I turn off the heat. The jars will stay warm for quite a while. I only use plastic lined lids for preserves as the all-metal lids can go rusty. I boil these for five minutes in water to sterilise them. If I use Le Parfait jars, I do the same with the rubber rings.
Damson Jam: The recipes above work well with damsons.
Leave a reply


I tried the recipe and followed it religiously. Number 9.When the jam has set carefully pour into warm, sterilised jars, using a ladle or small jug. (How to sterilise jars? See tricks and tips below). After letting the jam set I could not pour it into the jars. What am I doing wrong?
I think(I’m sure someone will correct me if I’m wrong) What is meant by set is when the jam has reached setting point but is still boiling hot. I think you are thinking that this means when the jam has gone cold and set but I could be wrong and apologise if I am.
Hi Cindy
Just about to make my first batch . Wish me luck!
So excited to find your recipe. I can’t wait to try it. I’ve been making jelly for years although I prefer jams and preserves because I found all of the tiny pits in the wild plums rather daunting. I had no idea that they would just come to the top!
Can i use any kind of jar?
I just tried this with the plums I have in northern California: we have some red and some orange wild plums, and some that I think are a hybrid because they seem to ripen to a blush pink. I used about 1.5# of red and 4.5# of orange to make a big batch, strained out the pits and skins with a regular pasta colander to allow the pulp to stay in (pushed through with a spoon and potato masher) and added some cinnamon, cloves, and allspice and a handful of bing cherries to deepen the color. It’s fantastic, and the only thing left is to see if it sets up properly. I’m pretty sure it will set but it’s not cool yet… can’t wait to eat more of it!
I used this recipe last night using wild plums harvested from Haggerston Park in Hackney, East London. The jam turned out beautifully! Many thanks.
The barely ripe recipe for wild plum jam was just perfect, really tangy and tart firm jam with loads of flavour. Thank you, we are trying the recipe for ripe plums today and I’m sure my little girl will enjoy licking the spoon!
How easy is it to identify these wild plums or wild cherry plums? I see lots of fruit growing in a park where I walk the dog but I don’t really have a clue what they are.
Cherry Plum time again, they’re throwing themselves into the road!
Like Clive on 2010, I recommend using a cherry stoner on these little beauties. Once upon a time, I burnt a batch of jam, skimming for stones. I find most of my local varieties grip the stone firmly, only a few are loose in the flesh, which would allow skimming to work. I do also crack some of the biggest stones with pliers, and put the kernels in. I tend to go for a middling recipe, plain sugar and not much water unless the juice won’t flow, works well for both yellow and red skinned types.
Thanks for setting me on the right track Fiona!
thanks for this recipe. i’ve recently moved house and was delighted to find we have a wild plum tree laden with fruit. i’ve made the first of the two recipes, tweaking it by dribbling about 50ml of some cassis over the plums before i covered them in the sugar to leave overnight, the taste is absolutely wonderful!